Pinterest is a huge traffic machine with over 450 million monthly active users. But posting manually is too time-consuming. In this article, I will show you how to fully automate Pinterest activities in n8n with n8n-nodes-pinterest – helps you post pins continuously, at peak times, without worrying about being blocked.
Is Pinterest Marketing Really Effective?
- 70% Pinterest users search for shopping ideas.
- 87% users have purchased a product after seeing it on Pinterest.
- ROI 2.5 times higher than other social media platforms.
- Content lifespan (pin lifespan): up to 4 months — while Facebook is only 24h.
Benefits of automating Pinterest:
- Save 10–20 hours/week.
- Post regularly even while you sleep.
- Maintain a continuous presence.
- Test content and optimize faster.
What Should Be Prepared?
1. Node Pinterest n8n-nodes-pinterest
Install directly in the n8n interface:
- Go to Settings → Community nodes → Install
- Enter node name:
n8n-nodes-pinterest - Tick I understand the risks
- Press Install
After installation, restart n8n for the new node to appear in the list.
2. Pinterest account with sufficient “trustworthiness”
- Account age: ≥ 1 month.
- Has had natural activity: like, save, follow, create board.
- Email verified, no previous violations.
3. Proxy (not required but recommended)
- Recommended type: Residential Proxy.
- Format:
http://username:password@ip:port.
Detailed Step-by-Step Guide
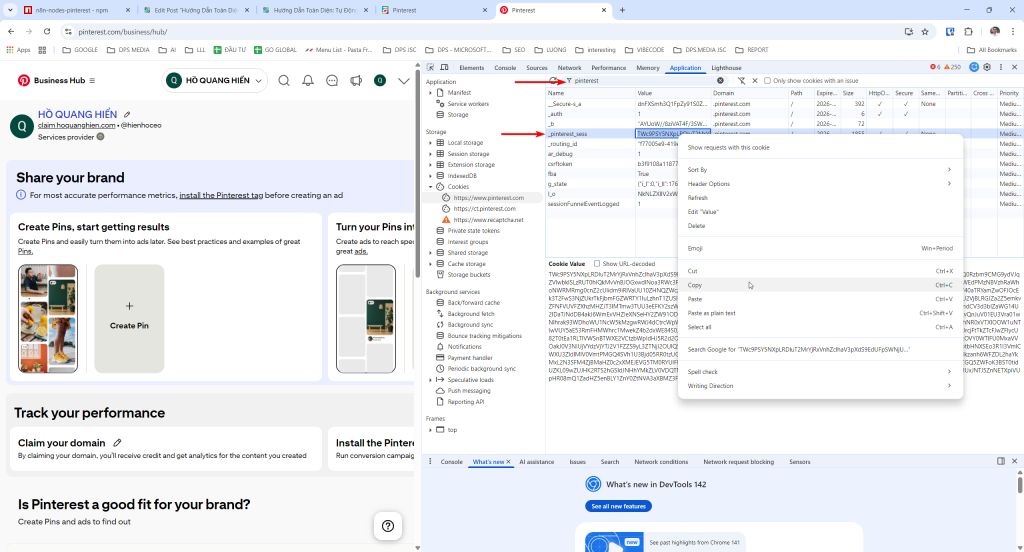
Step 1: Get Pinterest Cookie
How to get Session Cookie:
- Log in to your Pinterest account on Chrome/Firefox browser
- Open Developer Tools by pressing the key F12 or right-click → Inspect
- Select the tab Application (in Chrome) or Storage (in Firefox)
- In the left menu, find Cookies → https://pinterest.com
- Find the cookie named
_pinterest_sessand copy the value of it - Important: Do not log out after retrieving the cookie, otherwise the cookie will expire.
Tip: Use Incognito mode to log in and get the cookie, then close the tab without logging out.

Step 2: Create Pinterest Credentials
- Go to Credentials → Add Credential.
- Find “Pinterest Cookie” and enter:
Session Cookie: (paste the value of _pinterest_sess you just copied)
Proxy: (if any, format: http://username:password@ip:port)
Note: The cookie is valid for about 52 weeks, after which you will need to obtain a new cookie.
Step 3: Basic Pin Posting Workflow
Structure:
Manual Trigger ↓ Pinterest Cookie Node: Create Pin ↓ Response Message Details in node:
Board: (select from the list of existing boards)
Image URL: https://example.com/image.jpg
Title: Your pin title
Description: Detailed description of the pin Link: https://your-website.com (optional)
5 Sample Workflows to Get Started Right Away
Auto Pin from CSV
Automatically read CSV file and post to different boards.
HTTP Trigger ↓
Read CSV File ↓
Pinterest: Get Boards (get a list of boards) ↓
Code Node: Random board selection ↓
Pinterest: Create Pin ↓
Loop through each row in CSV
Bulk Auto Pin with Delay
Manual Trigger ↓
Read Google Sheets (list of pins to post) ↓
Loop with delay: ├─ Pinterest: Create Pin ├─ Wait 5-10 minutes └─ Log success
Multi-Board Pin Distribution
Post the same pin to multiple different boards.
Manual Trigger ↓
Pinterest: Get Boards (select 5 suitable boards) ↓
Split In Batches (5 items) ↓
Pinterest: Create Pin ↓
Aggregate results ↓
Send notification
Content Calendar Automation
Post on a schedule from Google Calendar.
Google Calendar Trigger ↓
Code Node: Extract pin data ↓
Pinterest: Get Boards ↓
Pinterest: Create Pin ↓
Update Calendar event
Tips to Avoid Getting Blocked on Pinterest
- Use cookies from accounts with a good activity history (≥ 1 month).
- Do not post more than 50 pins/day for new accounts.
- Alternate content from different domains to avoid spam.
- Use Residential proxy to reduce the risk of IP flagging.
- Ensure uploaded images have high resolution.
- Duplicate content across multiple boards should have a delay of 30-60 minutes.
Actual Results After 3 Months
| Before Automation | After Automation | |
|---|---|---|
| Posts/week | 7 (manual) | 35 (automatic) |
| Management time | 3h/week | 30 minutes/week |
| Impressions/month | 15,000 | 85,000 |
| Clicks to website | 200 | 1,200 |
| Leads | 5–10 | ~45 |
FAQ & Troubleshooting
Q1: How to retrieve the cookie when it expires?
A: Log back into Pinterest and repeat the cookie retrieval process as instructed in Step 1.
Q2: How many pins per day is safe?
A: New accounts: 10–20 pins/day, old accounts: 50–100 pins/day. Start with a small number and gradually increase.
Q3: Node does not appear after installation?
A: Restart n8n and check if the package has been installed correctly. Check if the package.json file contains “n8n-nodes-pinterest”.
Q4: How long until the cookie expires?
A: It does not expire unless you log out.
Useful Resources
- Pinterest Trends – research trending keywords.
- Pinterest API Docs – refer to endpoints.
🔥 If you find this useful, please share so more people know how to automate Pinterest Marketing!


